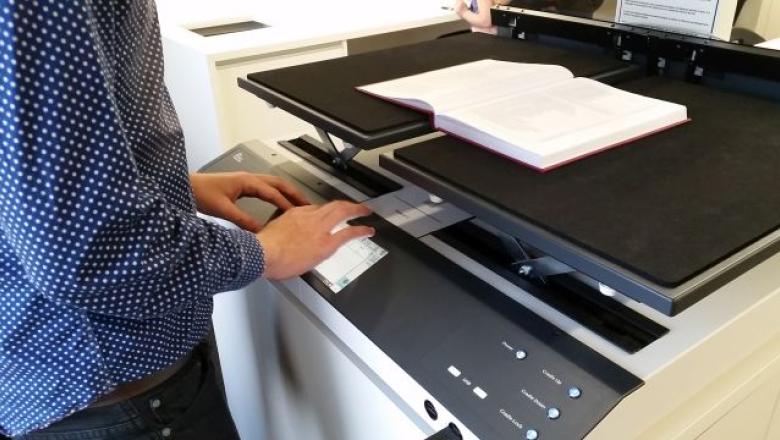
High quality specialised scanning
Scan special collections materials such as large maps, architectural plans, books and more, to USB, in high quality on our Book Eye scanner in the FW Robinson Reading Room.
You can also bring a camera for copying in the Reading Room.
Copyright applies to scanned materials.
Position your item
- Press the Power button. The machine will take 1-2 minutes to start.
- Insert your USB device. Accept the copyright notice on the scanner touchscreen to begin.
- Place your item in the centre of the adjustable panels (the cradle). Adjust the panels so the item is as flat as possible.
- Adjust the height of each side by gently pushing the cradle panels up or down.
- Use the up and down buttons to raise the cradle as needed.
- Lower the glass plate to flatten your item (for published material only).

An open book on the cradle of the Book Eye scanner. The right panel has been lowered so the book is flat.
Scan settings
Select a scan template
Using the touchpad, pick a scan template that matches the format of your item and quality you require.
- If you are using the glass plate to flatten your item, use one of the Glass Plate templates. Note - using the glass plate during Book mode and Map/Photo mode will cause a purple-black line across the page.
- When scanning multiple items, keep the same template. When you need to switch templates, send all currently scanned items to USB and start a new scan.
- Book: books, journals etc.
- Glass Plate: reflective or high gloss items.
- Map/Photo: flat items such as maps, photographs, manuscripts, plans and loose pages.
- High res (JPEG): 600 dpi, high quality/medium to large file size, publication quality. For example, this option may produce a 13 megabyte file per A4 colour page.
- High res (TIFF): 600 dpi, high-quality/very large file size (uncompressed), archival quality. For example, this option may produce a 110 megabyte file per A4 colour page.
- Low Res (PDF): 400 dpi, medium quality/medium file size, for creating multiple reference copies. For example, this option may produce a 3 megabyte file siz per A4 colour page.
- Quality: change the template you have chosen.
- Colour: for best results, choose colour, or greyscale.
- Page: Choose single to create one scan of the full item, choose double to split pages (e.g. in a book) into two scans.
- Brightness: adjust brightness if required (e.g. to reduce bleed-through text).
- Use Page up and Page down to move between scanned pages.
- Press the INS (Insert) to add a page between other scans. The scan will be added above the selected page.
- Select from additional settings, e.g. colour, single or double page or adjust brightness to adjust your next scan.
- Use preview and adjustment tools on the right to check your scan or insert or delete a page.
Scan items
- Press Scan on the touchscreen.
- You will see a light pass across your item as it is scanned.
- A preview of the scan will appear on the display screen.
Review your scan
Check the scanned page:
- Rotate the scan by selecting 270°or 90° (latest scan only).
- Zoom by selecting the magnifying glass button (latest scan only).
- Press Up or Down to move between scanned pages.
Press DEL (Delete) to delete the selected page as needed.
Continue or finish scanning
To continue scanning using the same template, follow the instructions from Step 1. The next scan will be added at the bottom of scanned pages unless you insert it at a particular position.
Otherwise, press Done to finish and save to USB.
Transfer the files to USB
Insert your USB device on the right-hand side of the Bookeye.
- Choose single files for TIFF or JPEG scans or Multipage PDF (when using the PDF template). Do not use the ZIP option.
- Select Continue.
- The files will be transferred onto the USB device.
After the transfer is complete, select:
- Exit to finish. The Bookeye will return to the copyright notice window and is ready for a new patron to use.
- End to start a new scan job.
- Continue to add more pages to the current scan job.
-
remove your USB device.
-
hold the Power button to turn the machine off. Leave the glass plate at the resting (top) position.
